Showing posts with label sewing. Show all posts
Showing posts with label sewing. Show all posts
Monday, December 30, 2013
Boys sewing: Buckles and Bobbins
Zach (age 11 now) developed an interest in sewing a couple of years ago. Unfortunately, he did not develop any patience to go along with it, so his sewing efforts have thus far been pitiful to say the least. Sewing is not a speedy hobby, at least not in the beginning that is for sure. Zach is a book learner to the core, so I started my hunt to find him some sewing books to aid my hands-on teaching. Needless to say, the choices among books for teaching a boy to sew are few, or at least they were a couple of years ago. [Anyone know of newer choices?]
We got a couple generic learn to sew books for kids to show how a machine worked, how to thread a needle, how to straight stitch and so forth (to reinforce the hands on componenent), and one complete with shapes to sew over to practice curves and basic manipulation of paper (leading to fabric manipulation while in the machine of course). But then we had a lack of progress in terms of real projects beyond a pillowcase or other super simple things. Most "first project" stuff really appeals more to girls (simple skirt and so forth).
Then I came across this book, geared for older boys. It is a bit pricey honestly, but I have nothing but praise for the content. It is a complete first sewing course with projects, and not all of them are super super simple. They truly put some thought into what would appeal to a boy, especially an older boy, and then taught them how to make it. I think boys especially need a final product to be interested at all, and a pillowcase is not going to cut it. Zach does not want to sit down and practice stitching with nothing at the end, or practice putting a button on nothing. He needs a garment. So boys will practice a zipper in an actual bag they want to use, or a cargo pocket on a fun pair of pants.
This book has pull-out, full-size pattern sheets. The kids will need to learn to trace off the size they need for the garments (size 8-16!!!!) on paper or whatever tracing medium you are using, then do the project. The instructions for the projects are clear and concise, simple without being dumbed down.
We haven't made all the projects, but one we use repeatedly is the PJ pant/short pattern and simple V-neck, scrub-style PJ top with a simple facing. Since his patience is low, I have taken over the sewing of these most of the time, but your child would have little to no trouble doing the pants on his own, slightly more with putting in the facing on the neckline of the top, but still very doable. The pants have a modification from PJs to daywear with a pattern add-on of side pockets and/or leg cargo pockets.
Again, I have nothing but praise for the very existence of this book to help boys, especially older boys, learn to sew with projects of interest to the age group. The content is good, clear and simple without being overly simplistic. They can create projects or gifts. Fit on the garments for stated sizing may be a bit generous but not awful, and very compatible with other typical envelope patterns. 5 stars for this one!

Monday, April 20, 2009
New Sewing Blog
I'm moving my sewing posts to it's own space! So, if you are interested in my sewing but not the other stuff, visit my new blog, which will be updated soon with lots of new sewing projects. I haven't been posting much, but I HAVE been sewing and am going to be getting some pictures soon. :)
Friday, March 13, 2009
Zach's new pants
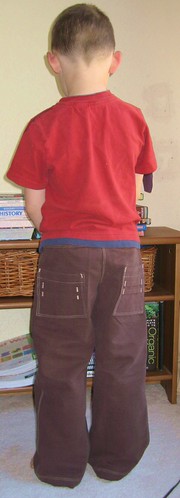

Today I finally finished up Zach's new pants, Ottobre 4/2008 #24, "Kalle Outdoor pants" done in a nice soft brushed twill. These are elastic waist, just like he likes, but with lots of fun details and pockets. Those same "fun" details and pockets, plus loads of topstitching, are why these pants have taken me the greater part of this week to sew. He is happy though, so it was worth it. :)
Monday, March 09, 2009
Ottobre 2/2009 camisole

Next up from the scrap bin is a top made from the newest Ottobre Woman issue, 2/2009. This is from pattern #1, the camisole top. I added a shelf bra to the design but otherwise no changes. It was so easy to sew, and I'm happy with the fit. Both the outer paisley crinkle cotton knit and the brown cotton lycra for the shelf bra were from my little knit scrap bin, so that was fun! :)
Sunday, March 08, 2009
New summer dress

Yes indeed, it is from the scrap bin fabric. Lily has herself a new summer dress. It was a super simple pattern, a freebie pattern from the SewingMamas website/forum, called the Jayme dress. It fits her nicely and is perfect for summertime. I can't believe how little fabric she still takes, even for a dress. :)
Wednesday, March 04, 2009
Knit scrap bin

What is this you ask? Laundry? A huge mess? It is my knit scrap bin. Anything knit fabric with odd size cuts out of it, less than 1 yard, etc., goes into the knit scrap bin. It has, ahem, gotten a bit out of hand. So March I'm going to be working on sewing up my scrap bin, starting with the knits. If I gain some ground on the knits, I'll be moving along to the woven bin, which is even larger than this one! Wish me luck. :)
Sunday, March 01, 2009
Ottobre 3/05 sleeper

I'm sewing again. Lily grew inches in the last month or so and her sleepers are too short, especially those with feet in them. So, I'm sewing away. If nothing else, I'm going to get really good at zippers. Here she is modeling her new one tonight. The pattern is from Ottobre Magazine, the Autumn 2005 issue (3/2005). This came out really nice, I think. It has the crotch gusset like the Kwik Sew one I was using. That gives great fit for cloth diapers. I added the little snap tab at the top to the pattern because she is starting to unzip herself. I plan to make more of this style.
Monday, February 23, 2009
Lily in her new jacket

I finally finished Lily's jacket I started two weeks ago. I ran out of binding and had to order the brown binding from Canada. Yes, Canada. Talk about hard to find a match. I should have measured better before I started so I would not have run out. In any case, I finally finished it with the last 8 inches of binding I needed.
She liked it and didn't want to take it off. That is a miracle given she had stomach flu hit in the predawn hours this morning through mid morning. She napped and got her new jacket when she woke up. She perked up as she likes new things. :)
Friday, February 20, 2009
Kwik Sew 1037

I finally made Lily some sleepers that I am really happy with. This is from Kwik Sew 1037, made in a really really stretchy aqua Malden Mills fleece.
I made a second pair then in a very thick fleece with little stretch, and those also came out quite well. I love being able to replicate our favorite PJs from stores.

In other news, note our model is standing so nicely. Lily began walking last month (at age 15 mos) and now is a walking pro, gaining speed by the day ... all the better to catch up with her brothers!
Friday, February 13, 2009
Noah got new shirts too

Lest you all think only Lily gets new clothing sewn by mama, I have to show you a new shirt I made for Noah last week. He got two of the same style, both from my favorite patterns (Ottobre). He is wearing it today so I was reminded to make a post showing it. Since he is out in the mud, it may very well be the last time he wears it too! He manages to completely destroy a shirt every other week or so lately (I threw out THREE today after trying OxyClean and then a bleach pen). He wasn't all that happy to model it that day, but he was all smiles when he put it on this morning.
Monday, February 09, 2009
Ottobre 1/09 #6

The newest Ottobre children's edition had the cutest little tunic for babies/toddlers. It was a little fussier to make than my usual super duper simple tees and leggings, but it was worth it! I did it in a very lightweight pink paisley jersey knit for summertime, and used some aqua polka dot ribknit that had been in my stash for about 6 years for the neckline binding, cuffs and leggings. I really like how it came out. It covers her arms and legs for crawling and exploring but is very lightweight for spring and summer evenings. I used my snap press for the little snaps on the front. I WISH I had some to match the aqua but just didn't have a similar enough color in my assortment so the dark pink was the best I could do.
I'm eager to make this one again in different fabrics, but I'm going to do a few other projects first. So many patterns so little time .... :)
Wednesday, December 17, 2008
Tutorial for a super simple case to fit an iphone
This is for an iphone but the instructions can be used to make a simple sleeve-style case for whatever you need. And I do mean simple. My goal was to have something to project it in my bag basically, while giving me the option of some minimal functionality with it in the sleeve.
COMPLETED:

First, you need to get the size you need. I laid my phone on my pattern material and added a generous seam allowance. My rectangle is 4-1/2 x 5-1/2 inches.

You need to cut 4 of those rectangles above: One back outside, one back inside, one front outside and one front inside. I cut 3 from cotton and 1 from a padded foam remnant. The padded foam is the back inside in mine. You will also need a piece of vinyl, described later.

Stack them RIGHT sides together with front outer to front lining and back outer to back inner.

On the back, sew just what will be the TOP of the case, lining to outside back.
On the front pieces, sew what will be the front opening. I did a rectangle paralleling the fabric, slightly less than 1 inch inside the margins.

Flip the back piece so the right sides are out and topstitch your one seam. This creates a neat back top for the opening for the case.

Cut out the window opening on the front pieces by cutting inside the inner rectangle you sewed. Cut close to the seam, and trim the corners very very close for turning.

Turn the front piece right side out and press it.

On what will become the top of the front, fold in your edges to prepare for topstitching that opening neatly.

Now cut your vinyl window piece slightly larger than the opening in the front.

Stitch the vinyl to the back of the front piece, covering the window opening with the vinyl. Also topstitch what will be the top front of the case. This is just to make a neat edge at what will be the opening of the case in the front.

Layer the top of the case on the back, right sides together, and sew them around the 3 unfinished sides (sides and bottom of the case), leaving open what will be the case opening at the top.

Turn it right side out and you are done. Note turning vinyl is probably not recommended, but do it carefully and try not to crease it sharply and it comes out okay for me.

All done:

Suggested modifications I may try in the future are an arm band (elastic attached to the back piece before stitching the body of the case together) for DH as he has requested, plus a snap at the top or closure, etc. You could make a ring to attach it to your bag or whatever too. You could create an opening for the camera eye in the back, opening for the speaker, etc. I just needed simple though as I carry mine in my bag and use a bluetooth headset for talking so this works for me.
COMPLETED:
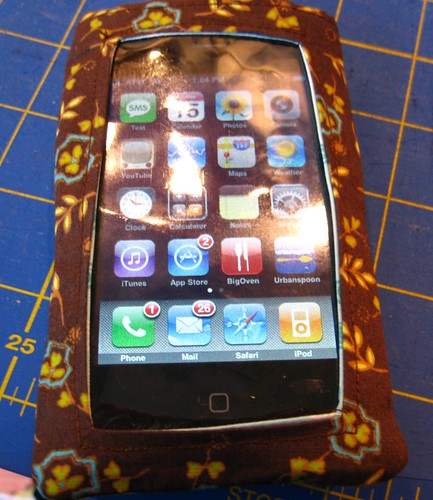
First, you need to get the size you need. I laid my phone on my pattern material and added a generous seam allowance. My rectangle is 4-1/2 x 5-1/2 inches.
You need to cut 4 of those rectangles above: One back outside, one back inside, one front outside and one front inside. I cut 3 from cotton and 1 from a padded foam remnant. The padded foam is the back inside in mine. You will also need a piece of vinyl, described later.
Stack them RIGHT sides together with front outer to front lining and back outer to back inner.
On the back, sew just what will be the TOP of the case, lining to outside back.
On the front pieces, sew what will be the front opening. I did a rectangle paralleling the fabric, slightly less than 1 inch inside the margins.
Flip the back piece so the right sides are out and topstitch your one seam. This creates a neat back top for the opening for the case.
Cut out the window opening on the front pieces by cutting inside the inner rectangle you sewed. Cut close to the seam, and trim the corners very very close for turning.
Turn the front piece right side out and press it.
On what will become the top of the front, fold in your edges to prepare for topstitching that opening neatly.
Now cut your vinyl window piece slightly larger than the opening in the front.
Stitch the vinyl to the back of the front piece, covering the window opening with the vinyl. Also topstitch what will be the top front of the case. This is just to make a neat edge at what will be the opening of the case in the front.
Layer the top of the case on the back, right sides together, and sew them around the 3 unfinished sides (sides and bottom of the case), leaving open what will be the case opening at the top.
Turn it right side out and you are done. Note turning vinyl is probably not recommended, but do it carefully and try not to crease it sharply and it comes out okay for me.
All done:
Suggested modifications I may try in the future are an arm band (elastic attached to the back piece before stitching the body of the case together) for DH as he has requested, plus a snap at the top or closure, etc. You could make a ring to attach it to your bag or whatever too. You could create an opening for the camera eye in the back, opening for the speaker, etc. I just needed simple though as I carry mine in my bag and use a bluetooth headset for talking so this works for me.
Friday, November 07, 2008
Happy birthday baby girl

I can't believe she is a year old already. I had to document it with a picture this week. This past year has just flown by.
Thursday, October 23, 2008
Zach's new shirt

It's been a while so time for a photo! This is a shirt I made for Zach.
In other news ... there isn't too much. We just go day by day, homeschooling, dealing with life. :)
In sewing news, I'm sewing for family lately, and preparing for holiday sewing. I have several things in mind for each of the kids. I'm working on Zach's denim rag quilt. It would be done by now had I not sewed a bunch of the blocks together wrong! GGGRR. I hate when that happens. But it is fixable with the seam ripper at least. It has set me back in my timeline for completion of that. I'll post a picture of that when I get it done. It is not complicated by any means, and not elaborate. It is my hope that it will serve him for many years as it is rather plain honestly, befitting of a growing boy who is getting past the cutesy stage.
I also have cut out 5 new tops for myself and sewed up 4 of them already, all from Ottobre. These were sorely needed as some of my shirts, in fact probably more than 50% of them, are older than Zach. I just needed to get moving on the shirts as they certainly are not hard to do, taking an hour or less each now that I have the pattern adjusted my shape.
The kids are quiet, so if I sprint off right away from the computer I may get to sew a few seams before someone needs mommy again.
Tuesday, July 15, 2008
Ottobre romper

I'm always at least one issue of Ottobre magazine behind. Just this week the new issue (fall things) arrived, and I sewed this up from the 3/08 edition. I did a 68 cm. The fit is good in width but just fits in length now with her cloth diapers so she will grow out of it quickly. That's okay though; we will enjoy it while it fits. No modeled shot this time as she is a little grumpy this morning and not into wearing it other than a quick fitting for snap placement prior to me completing the snaps.
Wednesday, July 02, 2008
New Outfit for Lily

I have been sewing a lot for my Etsy shop and not so much for the kids and husband so this week have been doing some more for them. This set is from Ottobre 2/2004 magazine, a simple little top and pants.
We have loads and loads of clothing for her, but honestly it is mostly pink. She looks great in more vivid colors. I feel bad sewing though when we have so much already for her given to us. It is pretty disappointing honestly. I looked forward to a baby girl for so many years and don't really get to sew for her. This is my compromise of sewing a tiny bit for her and using what was given to us. I'm too frugal to just donate what was given, but she may be my last baby and I will always regret not making things for her if I don't. So here she is in her mama made outfit today, my own little miss sunshine there.
Tuesday, June 17, 2008
Byron in his new shirt

Many thanks for the photo of Byron wearing a shirt I made for him through my shop. I loved making it, and hope he loves wearing it.
By the way, for more information about this family, their travels (WOW!) and their Etsy shop, please visit their blog Unkamen Gifts
Have fun on your travels!
Tuesday, June 10, 2008
Tutorial on creating a stenciled image on fabric
If your kids are like mine, they LOVE designs on their clothing. No plain T-shirts for these boys! The plethora of fabulous fabric co-ops on yahoo gets me pretty far in terms of cute knit prints, but sometimes there are images and motifs I want to do that I can't even find there. Embroidery you say? True, but to be honest embroidery is not a huge love of mine. I do some embroidery, and generally enjoy it, but that isn't a huge passion of mine. It also leaves some things a bit stiff, especially if it is a large design. Lately, I have been dabbling in some fabric painting with stencils and wanted to show you that as a tutorial today.
My disclaimer is there are many, many other ways to do this. I've tried a few of them, and my personal opinion is this is the easiest I have found so far. So, I'm going to share how I do it with photos. If you have tips, comment and share! :)
First off, you need to have something to put a design on. Duh, right? So get a shirt, or do I like do and sew one. Or pants, pillowcase, whatever you want to put a design on. Make sure though it has been washed to remove the sizing from the fabric, and do not use fabric softener. You want the paint to stick to it well. Different fiber contents will have different results but most knits I have tried have had decent success.
You need some paint. You want stuff that can be used on fabric, and not wash out. Look for ones that specifically say fabric, and ideally not "puffy" types of paints ala the 1980s for this type of use. Try your local craft store. I am in this example using an acrylic, which works rather well. I found my particular brand and color for this project in the clearance bins at JoAnns for 75 cents.
Next you need a design. My design today comes from Ottobre Design which is a European pattern magazine. They have print for free designs on their site as well for personal use. If you want this exact one, go to the site, choose English and then "print for free" on the right side. You can scroll through, find it and print it. While you are there, check out their magazine, which has truly incredible sewing patterns, and often has a few stencil designs in every issue as well. I can't rave enough about their patterns though for kids. Okay, back to the topic, you have some design.

You need to trace this onto the material you are going to use as a stencil. I like freezer paper. This paper has a waxy type coating on one side and paper on the other. Other people use plastic sheeting or a variety of other things. My instructions from this point forward, and my photos, show the use of freezer paper.
I neglected to get a photo of the tracing step, but lay the paper, waxy side down, on top of your design. Trace it onto the paper side.
Now you need to cut out the areas of the design that are going to get paint. Think carefully on this and visualize it in your mind. You want to remove the paper from the areas that are going to be filled in with paint on the shirt. You might even want to color those in on the design to picture it better, and then cut out the colored parts to be sure you have it right. Use a very sharp Exacto type of knife. I got mine from the scrapbooking supplies area. They have some with swivel blades and all different types. You want it very sharp and small to do detailed cutting. Use only on a rubber mat or protective surface so you don't damage the surface underneath. Cut out carefully the areas to be painted. Here is mine partially cut out:

Then completely cut out. Note I didn't remove the excess paper around the design. This is important. Only cut out the parts that get paint.

Position your stencil template on your fabric exactly where you want it, with the waxy side towards the fabric. This is very important -- make sure the waxy side is against the fabric! Take it to your ironing board. With an iron set to a warm setting, carefully iron over the freezer paper. This will soften the wax part and make it stick to your shirt. You want to be sure the paper is completely stuck to the shirt in all areas.

Take the shirt with stencil affixed to it to where you are painting. Put a protective layer inside the shirt so if paint bleeds through the front layer it doesn't stain the rest of the shirt. I used an old brown paper bag. Get your paint and start dabbing it on with a paintbrush or sponge into the areas cut out in the template.

Cover the whole area. It is likely you may need several coats as the paint soaks in a bit. The coats needed will depend on the fabric type, thickness and colors. I wait a few minutes and then recoat as it soaks in.
Here is my design all painted with several coats. Wait for it to dry a while like this.

You don't have to wait for it to completely dry, and I find it is better to remove the freezer paper when it is still a little damp. It works kind of like removing that blue tape when you are painting rooms. If you wait too long the edges of the tape stick to the painted surface too much. Carefully pull the template loose. Remember you stuck it there with the iron/wax, so it will be a bit stuck. Just carefully lift it loose, being careful not to smear the design. Then admire your new design!

Let the shirt dry completely (usually 24 hours or so) before wearing. Check your fabric paint bottle for specific instructions on your brand of paint. Have fun experimenting!
My disclaimer is there are many, many other ways to do this. I've tried a few of them, and my personal opinion is this is the easiest I have found so far. So, I'm going to share how I do it with photos. If you have tips, comment and share! :)
First off, you need to have something to put a design on. Duh, right? So get a shirt, or do I like do and sew one. Or pants, pillowcase, whatever you want to put a design on. Make sure though it has been washed to remove the sizing from the fabric, and do not use fabric softener. You want the paint to stick to it well. Different fiber contents will have different results but most knits I have tried have had decent success.
You need some paint. You want stuff that can be used on fabric, and not wash out. Look for ones that specifically say fabric, and ideally not "puffy" types of paints ala the 1980s for this type of use. Try your local craft store. I am in this example using an acrylic, which works rather well. I found my particular brand and color for this project in the clearance bins at JoAnns for 75 cents.
Next you need a design. My design today comes from Ottobre Design which is a European pattern magazine. They have print for free designs on their site as well for personal use. If you want this exact one, go to the site, choose English and then "print for free" on the right side. You can scroll through, find it and print it. While you are there, check out their magazine, which has truly incredible sewing patterns, and often has a few stencil designs in every issue as well. I can't rave enough about their patterns though for kids. Okay, back to the topic, you have some design.
You need to trace this onto the material you are going to use as a stencil. I like freezer paper. This paper has a waxy type coating on one side and paper on the other. Other people use plastic sheeting or a variety of other things. My instructions from this point forward, and my photos, show the use of freezer paper.
I neglected to get a photo of the tracing step, but lay the paper, waxy side down, on top of your design. Trace it onto the paper side.
Now you need to cut out the areas of the design that are going to get paint. Think carefully on this and visualize it in your mind. You want to remove the paper from the areas that are going to be filled in with paint on the shirt. You might even want to color those in on the design to picture it better, and then cut out the colored parts to be sure you have it right. Use a very sharp Exacto type of knife. I got mine from the scrapbooking supplies area. They have some with swivel blades and all different types. You want it very sharp and small to do detailed cutting. Use only on a rubber mat or protective surface so you don't damage the surface underneath. Cut out carefully the areas to be painted. Here is mine partially cut out:
Then completely cut out. Note I didn't remove the excess paper around the design. This is important. Only cut out the parts that get paint.
Position your stencil template on your fabric exactly where you want it, with the waxy side towards the fabric. This is very important -- make sure the waxy side is against the fabric! Take it to your ironing board. With an iron set to a warm setting, carefully iron over the freezer paper. This will soften the wax part and make it stick to your shirt. You want to be sure the paper is completely stuck to the shirt in all areas.
Take the shirt with stencil affixed to it to where you are painting. Put a protective layer inside the shirt so if paint bleeds through the front layer it doesn't stain the rest of the shirt. I used an old brown paper bag. Get your paint and start dabbing it on with a paintbrush or sponge into the areas cut out in the template.
Cover the whole area. It is likely you may need several coats as the paint soaks in a bit. The coats needed will depend on the fabric type, thickness and colors. I wait a few minutes and then recoat as it soaks in.
Here is my design all painted with several coats. Wait for it to dry a while like this.
You don't have to wait for it to completely dry, and I find it is better to remove the freezer paper when it is still a little damp. It works kind of like removing that blue tape when you are painting rooms. If you wait too long the edges of the tape stick to the painted surface too much. Carefully pull the template loose. Remember you stuck it there with the iron/wax, so it will be a bit stuck. Just carefully lift it loose, being careful not to smear the design. Then admire your new design!
Let the shirt dry completely (usually 24 hours or so) before wearing. Check your fabric paint bottle for specific instructions on your brand of paint. Have fun experimenting!
Thursday, May 29, 2008
Our Patchy Dress Sold
Well, our patchy dress sold. I'm almost sad, but Lily just doesn't need clothing. If/when we get to the point that she doesn't have a whole closet full of things given to her, I will sew for her. In the meantime, I'm happy that it is going to a little girl who maybe doesn't have so many dresses! :) I sure did enjoy making it, and that is really what is important. Some days now I do get a tiny bit tired of sewing, but then I back off a bit and the enthusiasm comes back. Also a trip to the fabric store usually brings back the enthusiasm as I look at all the gorgeous fabrics, touch the textures and dream what I could make with this fabric or that one. A trip to the fabric store is like going to the spa for me usually, unless the kids are with me that is, in which case it is get in there and get out as fast a possible! LOL
Sunday, May 25, 2008
The wonders of IKEA aka my storage solution

So honestly I am trying very hard to have less plastic in my environment, such as less plastic toy items for the kids, less plastic wrap, plastic bags, plastic baggies, plastic dishes, on and on. However, I have to admit that this new plastic gizmo from IKEA is PERFECT for my new set of 1000 plastic snaps. So there we go again with plastic, true, but I would rather have a plastic snap on a bib than velcro that sticks all over to everything. So I have here 1000 various color plastic snaps. And now I have the absolutely perfect size container to store said plastic snaps. Woot!
Subscribe to:
Posts (Atom)