After much thought and consideration, I'm going to do some Etsy selling. For those of you who haven't tried it, Etsy is an online buying/selling marketplace specifically for handmade items. It is absolutely free to register to buy, and there are so many beautiful items on there, lovingly crafted with attention to detail.
My shop is called WeeBeaks take a look at my very very few items so far! :)
http://weebeaks.etsy.com
Friday, February 29, 2008
Tuesday, February 26, 2008
Retrofitting a waistband with buttonhole elastic
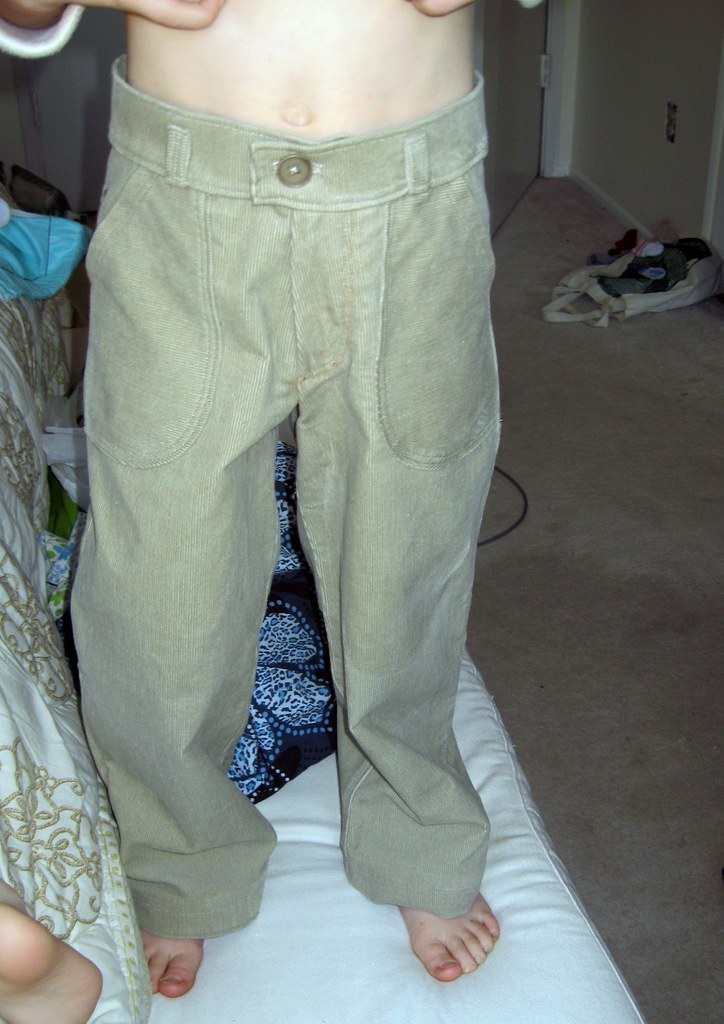
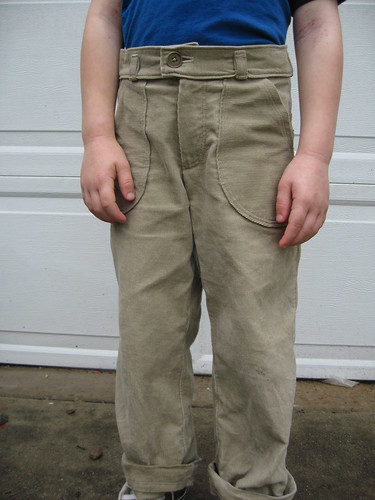
So, a while back I did Ottobre pants, slim fits, but they were still too large for Zach. I eventually set them aside for a growth spurt. He has had said growth spurt and they fit okay in length and better in hip now ... but still much too large in the waist.
So original pants are here, but larger actually than they appeared, i.e., they fell down when he walked:
Thanks to the Ottobre English yahoo group, I was given verbal instructions on how to fit them, by inserting buttonhole elastic into the waistband. This would have been a lot easier had I done this in the first place by the way. But, they were already created and he wanted to be able to wear them, so I did the retrofit. Sorry the pictures are crummy but hopefully will be helpful to you all who need to do this for any of your tall skinny kids. :)
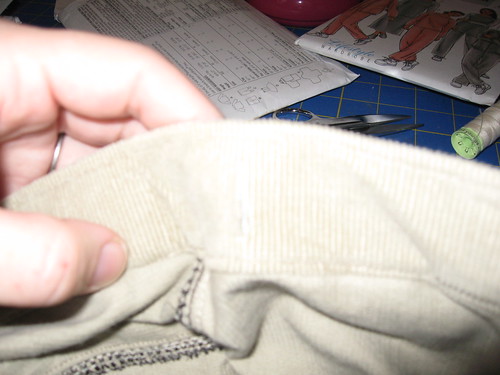
It is very very handy if you have an existing pair of pants with buttonhole elastic in them to refer to on placement. This is not essential, but it is helpful. Take the pair you need to modify and look on the inside of the waistband. Choose a spot for the opening for the elastic to go in. A good place for this is usually just past the side seams toward the front so that it would rest approximately between the side seam and the center front. There is going to be a button just past it so try to pick the place you think would be most comfortable on wearing. On the pants in the photo, I have my thumb at approximately that place. You can see the side seam in the photo:
Now get your seam ripper. Very carefully cut a vertical slit in the only the inner waistband at the site chosen above. Be careful not to cut the outer waistband (the part you see on the outside when the pants are being worn). The slit needs to be ideally the width of your buttonhole elastic.
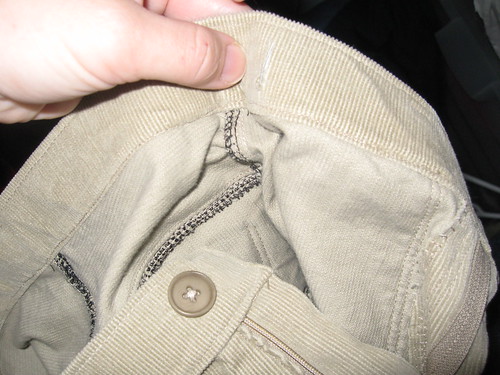
In my pants example, the fabric is corduroy. It will fray badly if left just cut. If your pant fabric will not fray, you may be able to insert the elastic now. Most fabrics though you will need to do a handsewn buttonhole. Note you can probably sew the buttonhole first and then cut it open like you would on a machine; however, it is a little easier to cut first in this instance for me so I could be careful not to catch the outer waistband in my sewing. Anyhow, sew the buttonhole by hand. I did the extra step of adding Fray Check on the raw edges to help stop the raveling. I started at one end with tacks across the opening to reinforce the ends, down one side, wide across the buttom and back up the other side. Most anyone will end up with a prettier result than me because I really am bad at handsewing. LOL.
Starting the buttonhole sewing:

Do the buttonhole on both sides.
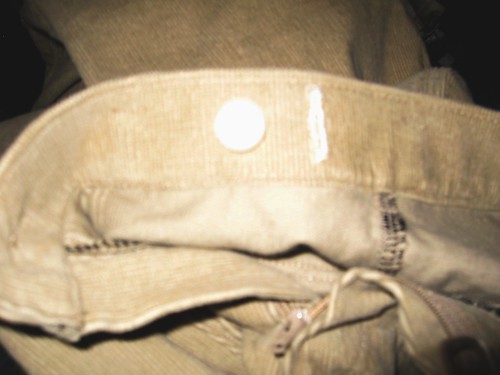
Now you need to sew a button on each side just a little ways in front of each hole. Mine are 1 inch from the buttonhole. Choose a button that comfortably goes through the holes in your buttonhole elastic but do not allow it to slip back through.
All that is left to do now is thread your buttonhole elastic into the casing. Cut a length of elastic the distance from one button to the other along the back waistband. The object is that if it were inside the waistband unstretched there would be no reduction in the waistband; the waistband would be the original length (so if your child grows you are all set!). Feed it through one end into your buttonhole created. I use a bodkin for it but a safety pin works well too. Hook one end on one button, pull it through and hook the other end on the other button. Adjust it by pulling tighter or loosening to fit your child. Put the button through the appropriate hole.

Enjoy the fact the pants no longer fall down!
So original pants are here, but larger actually than they appeared, i.e., they fell down when he walked:
Thanks to the Ottobre English yahoo group, I was given verbal instructions on how to fit them, by inserting buttonhole elastic into the waistband. This would have been a lot easier had I done this in the first place by the way. But, they were already created and he wanted to be able to wear them, so I did the retrofit. Sorry the pictures are crummy but hopefully will be helpful to you all who need to do this for any of your tall skinny kids. :)
It is very very handy if you have an existing pair of pants with buttonhole elastic in them to refer to on placement. This is not essential, but it is helpful. Take the pair you need to modify and look on the inside of the waistband. Choose a spot for the opening for the elastic to go in. A good place for this is usually just past the side seams toward the front so that it would rest approximately between the side seam and the center front. There is going to be a button just past it so try to pick the place you think would be most comfortable on wearing. On the pants in the photo, I have my thumb at approximately that place. You can see the side seam in the photo:
Now get your seam ripper. Very carefully cut a vertical slit in the only the inner waistband at the site chosen above. Be careful not to cut the outer waistband (the part you see on the outside when the pants are being worn). The slit needs to be ideally the width of your buttonhole elastic.
In my pants example, the fabric is corduroy. It will fray badly if left just cut. If your pant fabric will not fray, you may be able to insert the elastic now. Most fabrics though you will need to do a handsewn buttonhole. Note you can probably sew the buttonhole first and then cut it open like you would on a machine; however, it is a little easier to cut first in this instance for me so I could be careful not to catch the outer waistband in my sewing. Anyhow, sew the buttonhole by hand. I did the extra step of adding Fray Check on the raw edges to help stop the raveling. I started at one end with tacks across the opening to reinforce the ends, down one side, wide across the buttom and back up the other side. Most anyone will end up with a prettier result than me because I really am bad at handsewing. LOL.
Starting the buttonhole sewing:
Do the buttonhole on both sides.
Now you need to sew a button on each side just a little ways in front of each hole. Mine are 1 inch from the buttonhole. Choose a button that comfortably goes through the holes in your buttonhole elastic but do not allow it to slip back through.
All that is left to do now is thread your buttonhole elastic into the casing. Cut a length of elastic the distance from one button to the other along the back waistband. The object is that if it were inside the waistband unstretched there would be no reduction in the waistband; the waistband would be the original length (so if your child grows you are all set!). Feed it through one end into your buttonhole created. I use a bodkin for it but a safety pin works well too. Hook one end on one button, pull it through and hook the other end on the other button. Adjust it by pulling tighter or loosening to fit your child. Put the button through the appropriate hole.
Enjoy the fact the pants no longer fall down!
Monday, February 25, 2008
Alternative to paypal?
I was alerted earlier in the month to a good viable alternative to paypal called Revolution Money Exchange. Honestly when it comes to moving money around online I'm pretty conservative, so I let everyone else do it first. haha. Anyway, several people have reiterated to me great luck with it for the past month in transactions, especially for sellers on Hyena Cart and Etsy, or through the online forums. It works really wonderfully apparently for buyers/sellers who sell the occasional item in the forum or buy the occasional item, with neither party really wanting to pay feels associated with most Paypal accounts. It is through an actual bank, and you can choose to tie your own bank account to it or not, at your preference. The best thing? Through Feb 29 when you sign up you get $25 deposited in your account. Yes, REAL MONEY that you can then go spend however you want to. I finally did give in and get an account and get my $25 too. Give it a shot. And, yes, they do have a referral program whereby the person who referred you gets $10 if you sign up (you still get the $25 either way). If you need a referral, contact me (include an email address where you can at least receive the invite) and I'll send you a link! I gave my referral to the person who first told me about it, a happy buyer/seller. :)
We'll see if they are really able to compete with Paypal (which is owned by Ebay in case you didn't know that) in the long term. In the meantime though, I'll enjoy my incentive and give it a shot as I have disagreed recently with a lot of Ebay's policy changes and Paypal fees being raised.
We'll see if they are really able to compete with Paypal (which is owned by Ebay in case you didn't know that) in the long term. In the meantime though, I'll enjoy my incentive and give it a shot as I have disagreed recently with a lot of Ebay's policy changes and Paypal fees being raised.
Thursday, February 21, 2008
Simplicity 4434

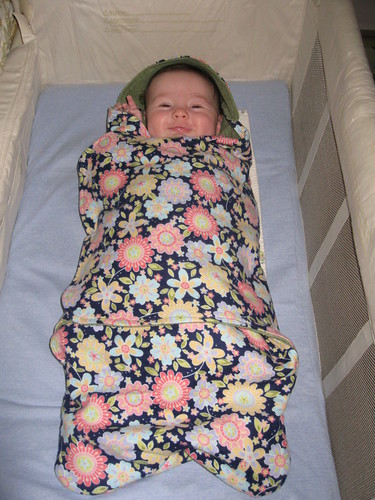
More sewing today, this time a warm cuddly blanket for Lily. I used Simplicity 4434 and modified the construction some. The outer is fleece from Jo-Anns and the inner is green cotton sherpa from Wazoodle.com. I will be doing a review on Pattern Review detailing all the changes I made for anyone interested.
Ottobre 1/08 #28
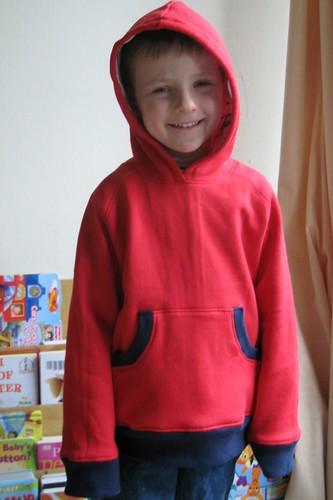
Yesterday's sewing was a new hooded sweatshirt for Zach. A review of the pattern is at Pattern Review. He has had a huge growth spurt since fall, and so most of his warm sweatshirts now have 3/4 length sleeves on him, and the bottom hits about his belly button. Time for new ones! :)
Friday, February 15, 2008
The story of the shirt ...

Okay, now for something a little more lighthearted. I am trying my very best in 2008 to do homemade gifts, so along comes Valentine's day as it does at the same time every year. But time got away from it and it was 2/14 and I did not have anything for DH. What to do, what to do .... clothing? Okay. I found some very soft red knit in my stash, off to a good start. I didn't want a plain ole red shirt though ... booorrrinnng. Okay, I'll embroider it. But wait, embroidery on a men's shirt is not all that common honestly and I don't want something looking feminine at the end. With that in mind, of course, I skipped embroidering a big red heart on the front. ;)
I finally found that neat bicycle you can see in the photo, and downloaded it (for free from one of the sites!). Off to a great start, right? I cut out the shirt and somehow missed cutting out the neckband. On finishing up and being happy to basically use up every last inch of my red fabric (hey, no scraps to find a use for later, right?) I discovered this. Okay, I thought to myself, I'll just use some other red from stash fabric. With a stash of literally hundreds of yards of fabric, there has to be a decently matching red ribknit. You guessed it though - nothing! I set that problem aside for later and sewed the basic shirt for shoulder seams, inserted the sleeves flat and left the sides open. On to the embroidery.
Despite very careful checking several times on hooping, I stitched out that bicycle and discovered it was off center - BADLY off center, i.e., not enough that it could be construed to be supposed to be on the left or right chest, and not close enough to the center to not be obvious. Okay, set that problem aside and go back to the neckline issue.
I made the bicycle green so finally decided to do a green neckband. And luck was finally with me and I found a decent match both in color and weight of the fabric needed. Woohoo!
Back to the embroidery problem though. I finally decide to put a stick figure person with the bicycle, and I start hunting for one. I don't have one already so I need to search. I find one at Ann the Gran that will work. Back in business here on the shirt, of course it is now mid afternoon ....
I try to download it. Oh no, her site was revamped and I CANNOT get it to download. I have never had problems with downloading from her site before. I check the forums there, and I'm not the only one having problems. I search through what seems like a hundred other sites and don't find anything that works quite as well. I break for chores and tasks for a couple hours, consider throwing the shirt in the trash and come back. I try Firefix rather than IE and finally get it downloaded. Back in business .... and it's 4:30 p.m.
I stitch the thing out, and it is not the greatest, slight puckering (after congratulating myself prematurely on the great job with the bicycle with no puckering). And then I discover somehow the underneath fabric worked its way underneath the hoop and got stitched in the design. So now part of the bicycle is sewn to the design. I tear out a few hairs and then think rationally again. It is only the far part of his front foot sewn to it --- so I rip out those stitches carefully and am left with a design minus part of his foot. I tack the rest of the design back down so it doesn't all come out and move on.
I press it and look at it - not horrible and hey he can wear it for PJs if nothing else. At least the fabric is still soft and comfy. And it's the thought that counts, right?
Moral of the story: Note to self - start before 2/14 for next year's gift.
PS - At least the shirt fit beautifully when he tried it on. :)
A bad day
For those of you who do not know, Zach has been diagnosed as likely bipolar disorder rather than ADHD. He has been started on some antipsychotic meds to hopefully help calm his anger and rages and another medication classification that hopefully will lower his impulsivity and hyperactivity. The medication ideally will make it possible for him to work effectively with his therapist, something that is not particularly possible at this time due to his out of control state.
With that background, today is a bad day. Zach really has been doing quite well, with more even and stable mood. He has been redirectable and so forth. Today he had an explosion though. Right now he is in his room (having been carried there by me for hitting and screaming at his brother) for a time out to calm down. He has been screaming for a good 20 minutes at the top of his lungs, throwing things and just enraged. There is no possible way to get him into the hands on knees/deep breathing position we use, in conjunction with the advice of his therapist, for him to self calm. He was hysterical though so that obviously did not work. I moved him to his room for the safety of the rest of the family and he needs to stay there until calm. Blogging is my own self-calming method in a lot of ways. I am having such a hard time with this honestly. He continues to be more a "problem to deal with" than the joy a child should be. True, all children has their moments of causing their parents a lot of grief, but unfortunately that is his normal state and I am very frustrated. At this point, we basically cannot leave the house much with just me with the kids in case he explodes while we are out. My first issue has to be safety and I cannot provide him 1-1 safety measures and take care of Lily and Noah too if we are out. Zach has dashed across parking lots and streets before when enraged and hysterical, and I cannot take that risk.
His behavior also makes it extremely difficult to form and maintain any type of friendships for Noah or me. Honestly, what other parent would want to have to be around this type of child. He is my son, and I love him. Other parents don't have that love bond and choose usually not to want to be around us, leading to our essential isolation. I feel the sorriest for Noah. He in no way gets to enjoy the library toddler storytimes during the day, park outings and play dates his brother got. I wish I could provide those things, but circumstances do not allow it at this time.
I just continue to pray that some medication, therapy or just time and prayers will help Zach. We continue to struggle to do what is best for him (homeschooling, therapy, medications, scheduling, etc), but it is exhausting and I pray for strength to continue it day by day.
Wednesday, February 13, 2008
I won!
A few posts ago I told you about all the contests going on at the Bloggy Carnival. Well, I won something, and something wonderful too! From Tara I won three Bum Genius all-in-one diapers! I have really been wanting to try these so this is really, really exciting. Yes, cloth diapers are exciting in this household with 2 in diapers. The good news is they are a really really creative design on the pocket diaper to make it one size. The bad news is that they do not fit Noah. He is really big for his size though and pushing the upper limits of the recommended weights (8 to 35) pounds, as he is 32 pounds essentially. The good news is that they fit Lily quite nicely at the smallest snap position. I have to say though she is at least 12 pounds at 3 pounds, and these would not have fit her at all at 8 pounds. They would have been huge on her even at the smallest snap position, but then the same is true of our usual Motherease one-size too. That is what you get with a "one size" I think - one size fits most but not ALL! In any case, for any cloth diapering mommies out there, I highly recommend these. The fleece inner is nice and keeps skin dry, and the microfiber insert is very absorbant, which equals few to no leaks, always a good thing huh?
In any case, again, my thanks to Tara for giving these away, and to all the bloggers who participated in the Bloggy Carnival. I have since subscribed to several new blogs and am reading away. :)
In any case, again, my thanks to Tara for giving these away, and to all the bloggers who participated in the Bloggy Carnival. I have since subscribed to several new blogs and am reading away. :)
Tuesday, February 05, 2008
Ottobre apron
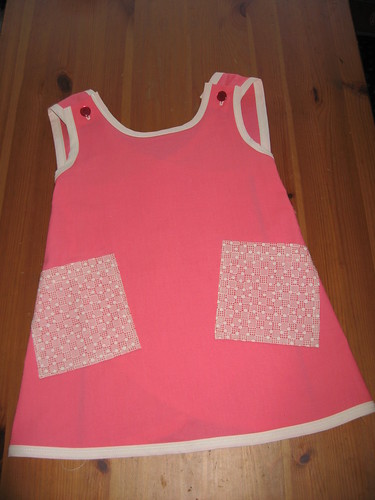
I have been quiet on my blog, but I have been sewing. I am participating in a swap at SewingMamas (www.sewingmamas.com) so have been completing my items to send in. One of the items I made was the cross-back apron from Ottobre 4/04. It came out pretty well I think. I like the old-fashioned lines for a girl, and the big pockets are cute, and a way to use up contrasting scraps of fabric. The pink has been in my stash a long long time, from freecycle I think with a bunch of other fabric. It had just enough for this apron with a tiny bit left so I was happy to basically use it up. :)
Subscribe to:
Posts (Atom)